Recipe: Irish Soda Bread

Standard

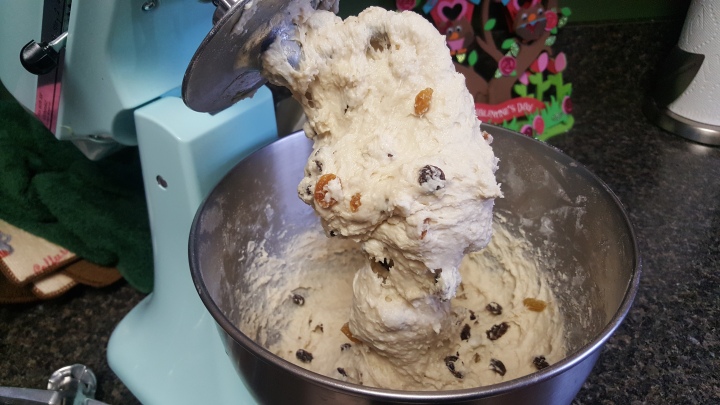
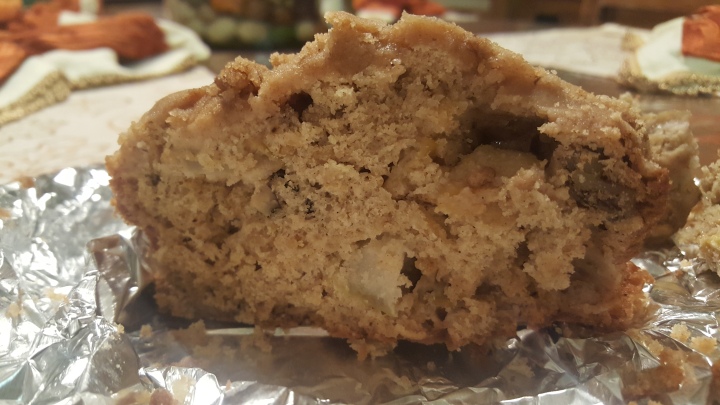
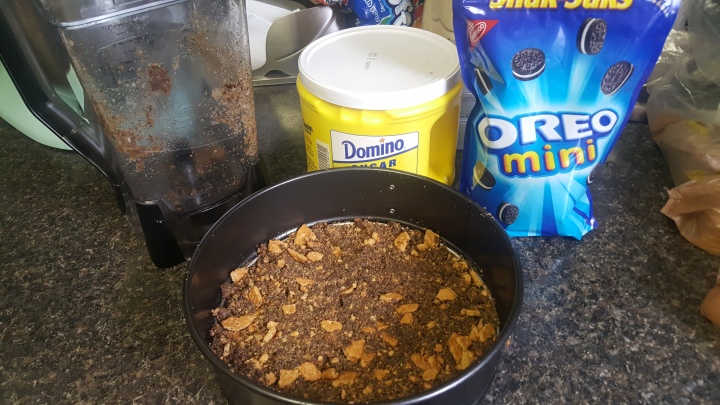
With sleet clattering down outside and aboveground subway service suspended, I found myself stuck at home during yesterday’s blizzard. School, of course, had already been canceled, so Todd was home too, and I wanted to bake us something yummy, something perfect for a cozy snow day. I decided that something would be Irish soda bread, considering this Friday is St. Patrick’s Day. I’ve never tried to make it before so I was a little worried, but then I found a really simple recipe on The Kitchen (one of my go-to websites for food facts and ideas). And though there are a few things I might do differently next time (include a little more sugar; add more raisins), I’m still really pleased with the result! It had a mild sweetness and a moist yet still kind of crumbly texture, which I enjoyed cold with a mug of hot coffee and then toasted this morning with butter and jam.

wp-1489604294888

Because I didn’t have buttermilk and could barely get up my driveway without slipping on ice, let alone travel to the store, I had to DIY the process by adding two tablespoons of lemon juice to two cups of regular whole milk and letting it sit for 30 minutes to thicken. Another way to do this is with vinegar, as my fellow blogger over at Happiness in Jars did yesterday when she, too, baked an Irish soda bread! And now for the recipe, slightly adapted from the one I found on The Kitchn:

Ingredients
~Oil or nonstick cooking spray, for greasing
~4 Tbsp. unsalted butter, chilled and cut into cubes
~3.5 cups all-purpose flour
~1/2 cup whole-wheat flour
~2 Tbsp. sugar
~2 tsp. baking powder
~1 tsp. baking soda
~1 tsp. salt
~2 cups buttermilk
~1 cup raisins (I  used a mixture of regular and golden)
~2 Tbsp. heavy cream, for brushing

wp-1489603157724.jpg

Preparation
~Make sure oven rack is in the middle position, then preheat oven to 400 degrees. Lightly grease a baking sheet with oil or nonstick cooking spray.
~In a large bowl or the bowl a stand mixer, whisk together flours, sugar, baking powder, baking soda, and salt.
~Add butter cubes and use your hands to squish them with dry ingredients until mixed and no large clumps remain.
~Add buttermilk and raisins and either use a spatula or a stand mixer’s dough hook to combine. When wet and sticky, remove dough from bowl, plop onto prepared baking sheet, and shape into a slightly flattened ball about 7 to 8 inches in diameter.
~Using a sharp knife, score a large X into the top of the loaf from end to end, about a half-inch deep. Brush top of loaf with heavy cream.
~Bake until golden on top and the center of the X has lost its wetness, about 45 to 50 minutes. Around the 30-minute mark, check to make sure bread isn’t too brown; if it is, tent with foil and continue baking until done.
~Cool on a wire rack for at least 10 minutes before serving. Store, wrapped, at room temperature for up to three days.

Nutritional information: approximately 85 calories per ounce.


Recipe: Applesauce Chicken Casserole

Standard

On weeks that Todd and I are both super busy with work, it helps to cook a few simple-to-make dishes on a Sunday, especially ones that can last for a few days. But if we’re going to eat the same food several nights in a row, it needs to be tasty. With that in mind, I created this applesauce chicken casserole; it’s based on an apple-cider chicken recipe, but I added tons of vegetables and used applesauce because I didn’t have any cider. It worked really well, giving the chicken a yummy coating that crisped nicely during roasting without burning. And there was a ton of food, so we definitely had enough for the next couple of evenings! Here’s the recipe…

15051921_10105560991634989_411324345_o.jpg

The casserole: toasted breadcrumbs, crisp chicken, and a bed of healthy veggies.

Ingredients
~1 tbsp. butter, softened
~1/2 cup apple sauce
~1/4 cup chopped parsley
~1 medium yellow onion
~10 ounces sliced mushroom
~4 ounces baby carrots, cut in half lengthwise
~1/2 small head cauliflower, broken into florets
~1/2 small sweet dumpling squash, cut into chunks and softened in microwave
~1/4 cup cooked peas
~Salt, to taste
~Pepper, to taste
~1/4 cup vegetable oil
~1.5 lbs chicken thighs
~1/4 cup bread crumb tossed with a sprinkle of parmesan

Instructions
~Preheat oven to 400 degrees.
~In a small bowl, mix butter, applesauce, and parsley until well combined.

15034132_10105560991605049_1665497065_o.jpg

~In the bottom of a rectangular baking dish, scatter onion, mushrooms, carrots, cauliflower florets, squash, and peas. Season with salt and pepper, add oil, then toss to coat.

14976233_10105560991610039_138526262_o.jpg

I used a purple cauliflower I found at the farmer’s market. It looked so pretty!

~Dunk each piece of chicken in applesauce mixture until well coated. Set aside  remaining applesauce, then arrange chicken pieces, skin side up, over vegetables. Pour remaining applesauce mixture over chicken and let soak into veggies below.

15034319_10105560729051209_599713183_o.jpg

~Roast for 30 minutes, then lower temperature to 375 degrees. Roast until vegetables are tender and chicken reads 165 degrees on an instant-read thermometer, about another 30 minutes. Add bread crumb and parmesan topping and roast until bread crumbs are lightly toasted, about 10 minutes.
~Serve and enjoy 🙂

Recipe: Apple-Walnut Quick Bread

Standard

I’ve made quick breads in so many variations: mostly banana, but also blueberry and cherry oat. This time, armed with two bags of apples from our annual visit to an upstate orchard, I decided on apple-walnut bread with a coffee cake streusel topping; I used Ovenly’s salted apple bread recipe as a guide, with several tweaks to make it a little sweeter, softer, and nuttier. As a bonus, this recipe makes a ton of extra streusel, and you can store the leftovers in the freezer to use in other baking projects.

20160926_195323.jpg

Ingredients for streusel
-1 cup all-purpose flour
-3 Tbsp. sugar
-2 Tbsp. packed light brown sugar
-2 tsp. cinnamon
-4 Tbsp. unsalted butter (melted)

Ingredients for bread
-1/2  cup unsalted butter (melted) plus extra (softened) for greasing the loaf pan
-3/4 cup plus 1 Tbsp. whole milk
-1/2 cup sugar
-1/4 cup light brown sugar
-2 large eggs, at room temperature
-1/4 cup maple syrup
-1/4 cup canola oil
-1/2 tsp. vanilla extract
-2 cups all-purpose flour
-1/2 cup whole wheat pastry flour
-1 cup rolled oats
-1 Tbsp. cinnamon
-1 tsp. baking soda
-1 tsp. baking powder
-1 tsp. salt
-1/2 tsp. allspice
-1/4 tsp. cloves
-1/4 tsp. nutmeg
-1 cup chopped walnuts
-1.5 cups peeled, cored, and cubed apples
-Streusel topping

photo-sep-24-6-15-08-pm

Preparation

  1. Prepare streusel: In a medium bowl, whisk together flour, both sugars, and cinnamon. Add the melted butter and use your hands to mix until clumps begin to form. Set aside.
  2. Preheat the oven to 375 degrees. Grease a 9″ x 5″ loaf pan with softened butter.
  3. In a large bowl, whisk together milk, sugar, eggs, maple syrup, oil, vanilla extract, and melted butter until well blended.
  4. In a separate large bowl, combine both flours, oats, cinnamon, baking soda, baking powder, salt, allspice, cloves, and nutmeg.
  5. Using a spatula, add the dry ingredients to the wet ones until just combined. Fold in walnuts and apples until evenly distributed through the batter.
  6. Pour the batter into the prepared pan and top with streusel. (Any leftover streusel can be stored in the freezer for up to one month.)
  7. Bake until a toothpick inserted into the center of the loaf comes out clean, about 50 to 55 minutes.

Recipe: Coffee Cheesecake

Standard

A few weeks ago I really wanted to make a coffee cheesecake, but every recipe I came across called for coffee liquor, which I didn’t want to use. Finally I stumbled across a recipe from the blog Cookie Dough and Oven Mitt, made a few changes to it based on what I had available in my apartment, and got a super-creamy cheesecake with a light coffee flavor (because I used cold brew instead of instant coffee; for more of a coffee flavor in your cheesecake, use instant coffee as recommended in the original recipe), with a chocolate ganache layer and also topped with ganache, coffee whipped cream, and chocolate-covered coffee beans. It looks like a lot of steps, but I promise it’s not actually that hard and it’s totally worth it!

wp-1474054253738.jpg

Ingredients
For the crust:
~15 honey graham crackers, crushed
~1.25 cups mini oreo cookies, crushed
~1 stick unsalted butter, softened
~2 Tbsp. sugar

For the ganache:
~1.5 cups heavy cream
~20 ounces bittersweet chocolate chips
~1/4 cup cold brew coffee

For the coffee whipped cream:
~1 cup heavy cream
~2 Tbsp. instant coffee
~2 tsp. cold water
~1/4 cup powdered sugar

For the cheesecake filling:
~3 (8 oz.) packages cream cheese, at room temperature
~1 cup granulated sugar
~3 large eggs
~1/2 cup sour cream
~1/2 cup thick vanilla yogurt (I used the New York-based brand Siggi’s, which is actually an Icelandic skyr, but any type of Greek yogurt should work fine as well.)
~1 Tbsp. vanilla bean paste
~1/4 cup plus 2 Tbsp. cold brew coffee

~Chocolate-covered coffee beans or nuts for decorating

wp-1474054260627.jpg

Preparation
For the crust:
~Preheat oven to 325 degrees.
~Combine ingredients in a blender and pulse until combined. (I like to leave some large graham cracker chunks in my crust, but it’s up to you how chunky you want it to be.)
~Press into a 9-inch cake pan. (The crust will only cover the bottom of the pan, so if you like your crust to run up the sides, I suggest doubling the amount that you make.)
~Bake for 10 minutes, then remove from oven and let cool.

For the ganache:
~While crust is baking, start on the ganache: Bring cream to a simmer in a saucepan over medium heat.
~Remove from heat and add chocolate and cold brew, whisking constantly until chocolate is melted and ganache is smooth.
~Pour 2 cups ganache into cooled crust. Freeze until ganache layer is firm, about 30 minutes. Reserve remaining ganache at room temperature for decorating.

For the coffee whipped cream:
~In a medium bowl, beat heavy cream until small peaks form.
~In a small bowl, stir together instant coffee and water; pour that mixture into heavy cream.
~Add powdered sugar and beat until thick and fluffy.

For the cheesecake filling:
~In a large bowl, mix cream cheese and sugar until fluffy.
~Beat in eggs one at a time.
~Stir in sour cream and yogurt and mix well.
~Transfer 1/4 of the filling mixture to a smaller bowl. Add vanilla bean paste to it.
~In original large bowl, add cold brew coffee and stir well.
~Pour 1/2 of coffee-infused filling into crust, then add 1/2 of vanilla filling, swirling with a knife to mix. Repeat with remaining coffee and vanilla filling. Bake cheesecake until golden but still slightly jiggly in the center, about 1 hour, then let cool.
~When cheesecake has cooled slightly, use a spatula to spread a layer of ganache over the top. Decorate with espresso cream and coffee beans or nuts.

Recipe: Maple-Peach Glazed Ham

Standard

Since returning from our honeymoon (the sequel to my Disneyland Paris update is forthcoming, as are some other posts about the trip) last week, I’ve been itching to get in the kitchen. On Friday I had the perfect excuse since two of my good friends were coming over for dinner. I had two conditions for my cooking: 1) I wanted to try something I’d never made before. 2) We had a half-day at work, so I wanted a recipe that I wouldn’t normally have time for on weeknights. That led me to a maple-peach glazed ham, adapted from this recipe in Taste of Home.

wp-1473077563196.jpg

Maple-peach glazed ham in the oven, nearly done baking, alongside a loaf of garlic bread.


I made a lot of changes to the original recipe, actually. Inspired by my mom’s recipe, which she’s been making for years and is really delicious, I surrounded the ham with Coca Cola during baking to keep it juicy. But since I had all that sweetness from the Coke, I didn’t want to also use sugar-laden peach preserves for the glaze like the original recipe called for. Instead, I used fresh peaches and a little bit of sugar to make my own peach compote, to which I added several more spices than called for in the recipe and a little bit of lemon juice and zest for brightness. Lastly, I used white peach instead of yellow peaches to give it a more subtle peach flavor, and I substituted litchi juice for the orange juice used in the original recipe…but that’s just because I don’t like orange juice. So if you can’t find litchi juice, feel free to use orange, or any other juice you love.

wp-1473077585157.jpg

Spices for the maple-peach glaze next to the little Ratatouille Eiffel Tower we got in France.

Ingredients
~1 (7- to 9-pound) fully cooked bone-in ham
~2 tbsp. brown sugar
~2 tbsp. garlic powder
~1 tsp. paprika
~1 tsp. ground black pepper
~10 medium white peaches, 3 sliced and 7 chopped (leave skin on)
~1/2 cup maple syrup, plus more for drizzling over ham
~1 (2 liter) bottle Coca Cola
~1/2 cup granulated sugar
~Spices for peach glaze, to taste: cinnamon, allspice, chili powder, pepper
~Lemon juice and zest (from 1/2 lemon)
~1/4 cup litchi juice (or any other juice)

Preparation
~Preheat oven to 325; lay ham cut-side down in a roasting tin.
~In a small bowl, mix together brown sugar, garlic powder, paprika, and pepper. Using your hands, spread rub all over top and sides of ham.
~Lay sliced peached on top of ham and layer them in bottom of pan, slipping some underneath the ham as well.
~Starting from the top left corner of the pan and moving to the right, drizzle maple syrup on top of peaches and ham in a zig-zag pattern.
~Fill roasting tin about halfway with Coca Cola.
~Bake ham uncovered for about 15 minutes, then cover and bake until a thermometer reaches 130 degrees, about 2 hours.
~Meanwhile, in a small saucepan on high heat, combine 1/2 cup water, granulated sugar, and chopped peaches (but save a generous handful of them to add later on).
~Stirring frequently, let cook until peaches start to soften, about 5 minutes.
~Add spices. I didn’t quite measure out what I added, but here’s an estimate if you want a guide: 2 tbsp. cinnamon, 1 to 2 tsp. allspice, 1 tsp. chili powder, 1 tsp. pepper. Cook 5 minutes more.
~Add maple syrup and litchi juice. Cook until sauce begins to thicken slightly, about 15 minutes. If it doesn’t, add more maple syrup as necessary. Remove 3/4 cup mixture for glaze.
~Remove ham from oven; brush with some of the glaze. Bake, uncovered, until a thermometer reaches 140 degrees, about 15 to 20 more minutes, brushing occasionally with remaining glaze.
~For serving, put remaining 1/4 cup compote into a gravy boat; to gravy boat, add juice and peaches from the roasting tin. Once ham is carved, pour some additional juice and peaches from tin over sliced ham.

Recipe: Peach Pie Crumble Bars

Standard

I keep meaning to post a garden update, but then I continually forget to take photos of the plants when I get home from work in the evenings. I’m going to try hard to remember tonight! In the meantime, I wanted to share this really good recipe (based on one I saw in Martha Stewart Living) for peach pie crumble bars. They’re great as a mid-afternoon snack when you need a pick-me-up or as a refreshing after-dinner treat. Mine came out a bit more like a crumble than a bar because I ran out of flour, but if you follow the recipe below, it should firm up perfectly. Continue reading

Recipe: Roasted Duck with Cherry Sauce

Standard

A few times a week, Todd cooks dinner for us since he gets home from work earlier than I do. Lately we’ve been drooling over duck dishes when we go out to restaurants, so he suggested that he try to make it at home. But since we’d never made duck before, we decided to find a recipe to guide us through it. After browsing through several cookbooks (we now have so many that they don’t fit on the shelves of our bookcase and are stacked on the floor), we settled on a roasted duck recipe from Drew Ramsey’s Eat Complete. Here’s the recipe (modified slightly from the original), and some special guest commentary from Todd on his cooking experience. Continue reading

An Easter Run and Recipe

Standard

Of all the Christian holidays, the celebration of Jesus’ resurrection is the most joyous. The songs at mass are uplifting and glorifying. We share treats and dinners with family and friends. Even nature seems to feel the spirit: little tulip stalks pop up from the dirt, the sun makes us squint in every selfie. And we take joy in the little things, the memories we create: a good run, a broccoli soufflé cooling on the stove…

Continue reading

Recipe: Spinach-Stuffed Chicken & Curry-Infused Couscous

Standard

As much as I enjoy being in the kitchen, I only make easy dinners during the week—crockpot stews, grilled cheese, pasta with a simple sauce. The other night one of my best friends came over and we decided to cook instead of eating out. After a little thought, we settled on chicken breasts stuffed with spinach, garlic, and mozzarella, with a side of curry-infused, veggie-loaded couscous. (Although the steps below might seem complicated, the recipe is really easy once you get started.) The chicken took about 45 minutes to cook, which gave us plenty of time to prep the rest of our ingredients, set the table, and indulge in some girl talk.

Continue reading

Recipe: Walnut-Topped Blueberry Loaf

Standard

Is it a bread? Is it a cake? The beauty of this walnut-topped blueberry loaf is its versatility, its ability to be whichever you want it to be. It’s not too sugary, so it tastes great toasted, blueberries bursting, and slathered with butter for breakfast. But its moist, dense texture and sweet topping also pair well with coffee or tea. The best way to decide? Bake it yourself and try it both ways!

Continue reading

Recipe: Morning Glory Layer Cake

Standard

The idea started small: buy dessert to bring to Staten Island on Sunday when we visited Todd’s parents. Soon after, I thought, why spend money on a sugar-loaded treat when I could make something myself? But when I considered each person’s tastes, it became clear that I couldn’t just bake a simple bundt cake or box brownies. I decided on a carrot cake with cream cheese frosting. I’d never made one before, so I searched online for a recipe; I settled on this one, mostly because it looked good in the picture.

Though I’d chosen a recipe, I didn’t feel ready to bake yet. I wanted to try something new—two somethings, in fact. The first, the mini heart-shaped layering pans I’d bought in advance of Valentine’s Day. The second, the new KitchenAid stand mixer my parents gave me and Todd for Christmas. But something still felt incomplete, so I decided to add dried papaya, dried apple, and dried pineapple to my cake, basically rendering it a morning glory cake instead of carrot. Thus, my Saturday baking project was born.

Continue reading

Recipe: Cinnamon-Raisin Brown Sugar Cake

Standard

I’ve baked cookies, muffins, and loaf breads. I’ve decorated cupcakes for Valentine’s Day, Halloween, Christmas, and everything in between. I’ve tried my hand at several pies: triple berry, maple peach, raspberry rhubarb, and classic apple more times than I can count. In September, I made my first bundt cake. All these baking experiments gave me the courage to attempt a real cinnamon-raisin brown sugar layer cake, almost wholly made from scratch (I bought the blue frosting).

12247164_10104472575459729_5734865182972834522_n.jpg Continue reading

Recipe: Fig & Pistachio Vanilla Bundt Cake

Standard

Now that I have my own apartment, I spend most of my time in the kitchen. I’ve made cookies: old-fashioned raisin, double chocolate, chocolate chip. I’ve done lemon-blueberry and chocolate chip scones. I’ve even tried my hand at Hungarian plum dumplings. The next item on my baking bucket list? A layer cake with buttercream icing, all made from scratch. I haven’t gotten there yet, but I did take a baby step toward that goal: a fig & pistachio vanilla bundt cake. (I used this recipe as a base, though I modified it a bit to add nuts and vanilla bean, along with a few other minor changes.) Continue reading

Recipe: Hungarian Plum Dumplings

Standard

I can’t remember the first time I tasted a Hungarian szilvás gomboc. I must have been only five or six years old, perhaps watching wide-eyed as my nagymama sliced open the thick breadcrumb-dusted potato dumpling to reveal the sticky purple plum inside and sprinkled it with cinnamon-sugar. I don’t know if I loved or hated it at first bite, whether I needed time to acquire the taste. I don’t know how many my mom let me eat, though now I can practically inhale five or six of them if I don’t stop myself in time.

Plum Dumpling Continue reading

Recipe: Old-Fashioned Raisin Cookies

Standard

It seems counterintuitive to bake in the summer heat, but that’s exactly what I’ve been doing the past few weeks—and I love it! I’ve flagged dozens of desserts in the cookbooks I own and have saved even more as webpage bookmarks. (S’mores bars, I’m looking at you.) I plan to have quite a few yummy treats under my baking belt before the season ends.

I most recently tried my hand at cookies: old-fashioned raisin and double-chocolate mocha, some of which contained walnuts. Though both were a hit with my boyfriend, I preferred the warm, comforting flavor of the raisin cookies. To make them, I adapted a recipe from Get Your Bake On by Brian Emmett; most notably, I used coffee extract instead of brewed coffee (it required less cleanup). Continue reading

Recipe: Seven-Mile Tropical Smoothie

Standard

Excitement over an unexpected job offer yesterday and delight in the gorgeous 82-degree day inspired me to not only lace up my Asics Gel Noosa Tri 9s and hit the pavement, but to run farther than I ever have before: seven miles! Although I won’t be winning any marathons at my pace—11:55/mile, and about 1 hour and 23 minutes in total—I didn’t feel too exhausted afterward. In fact, I had enough energy left to make a delicious cold beverage in honor of my new PR. I’m hopeful that its bright coral hue, fruity flavors, and white chia seeds will give me the oomph I need to start organizing collectibles in my new apartment after I finish this post.

Continue reading

Recipe: Cinnamon Maple Walnut Butter

Standard

I subscribe to at least 10 different magazines, which I make sure to read cover to cover every month so that I can learn new information, whether it’s about the top vacation destinations or how to take better care of my hair and skin. But the recipes are always my favorite part of any magazine, especially when they’re quick, easy, and delicious. One of my current go-to recipes is the do-it-yourself cinnamon maple walnut butter recommended by Runner’s World as a high-protein snack or lunch. I love it so much that I have plans to try out all of the other flavors, especially the almond coconut butter, and even to experiment with my own macadamia butter.

Continue reading

Recipe: Simple and Healthy Flounder Bake

Standard

Because Todd knows that I like to eat healthy foods that are easy to prepare, he recently bought us the Skinnytaste Cookbook, based on the popular blog of the same name. It contains so many delicious recipes that rely on bright vegetables, lean meats, and whole grains.

Now that Lent has arrived and some of us can’t eat meat on Fridays, I want to share a simple fish recipe from theSkinnytaste Cookbook that Todd and I really enjoyed: a broccolini flounder bake. As usual, we modified this version a bit. We cut out the cheese and oregano, added onions and piled on extra tomatoes, and served it over a rice medley.

Continue reading

Recipe: Four-Berry Wheat Muffins

Standard

Though I posted a recipe for cherry oat bread only a week or so ago, I decided to post my four-berry wheat muffin recipe today in case you wanted to do some healthy baking during the blizzard that’s coming our way!

Featuring strawberries, blackberries, raspberries, and blueberries, it’s based on a recipe that I found on Yummly. For the most part, my modifications were done out of necessity; I didn’t have enough strawberries to mix into the batter, so I used all four types of blueberries instead. It tasted delicious, so I highly recommend the method outlined below. And, as a bonus, your muffins will come out a stormy shade of blue—the perfect color for a blustery winter day.

Four-berry muffin

Continue reading

Recipe: Cherry Oat Bread

Standard

cherry oat bread
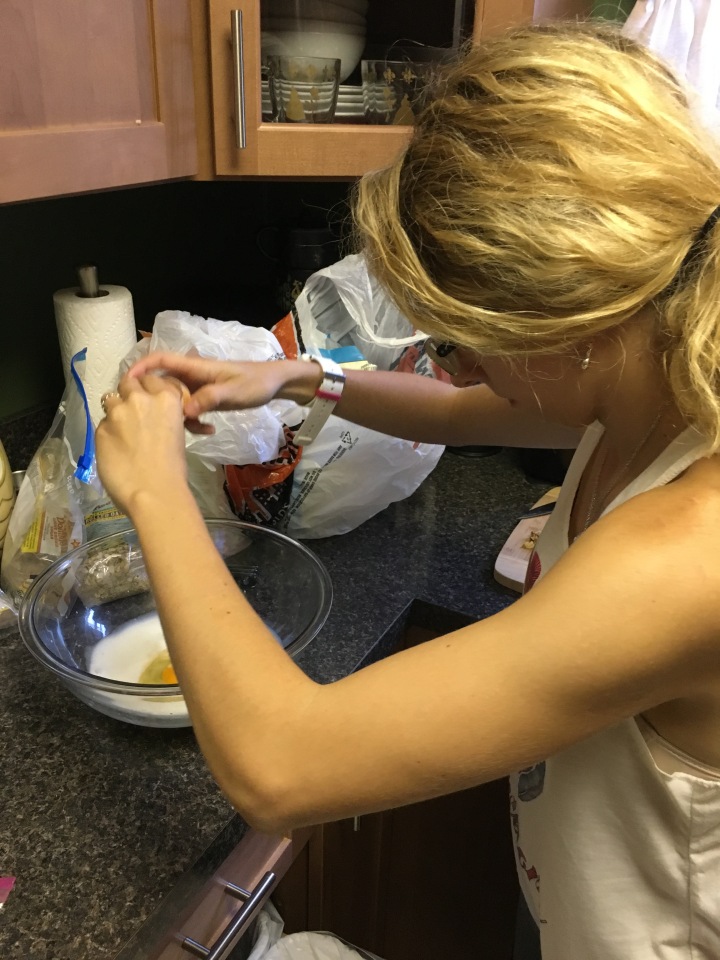
When my mom’s friend said she made a cherry oat bread, I knew that was something I wanted to bake, and luckily I had my mom’s help guiding me through. Though my mom’s friend kindly provided us with her recipe, we didn’t have all of the ingredients on hand, so we modified it as we went along, using a recipe we found online as a guide. The result was a moist, tasty, nutritious bread that satisfied everyone—chocolate chips on one side for me and my brother, walnuts on the other side for my mom, and some plain cherry slices in the center. The chocolate chip side tasted especially good when warm from the oven!

Continue reading